
A wedding cake was never on my bucket list of culinary accomplishments. However, I was so touched and honored when my greatest mentor, whom I’ve worked closely with throughout my entire professional career, asked if I’d make her wedding cake. I of course jumped at the opportunity and welcomed the challenge.
Baking for big occasions always makes me a littler nervous, the slightest adjustment, miscalculation, or distraction can result in total disaster. The added pressure of creating something that will essentially be one of the visual centerpieces of such an important (and photographed) event put me into a slight panic. It was definitely a learning process and now that I’m safely on the other side, I wanted to document some of the steps, recipes, tips (and mistakes), I made along the way.
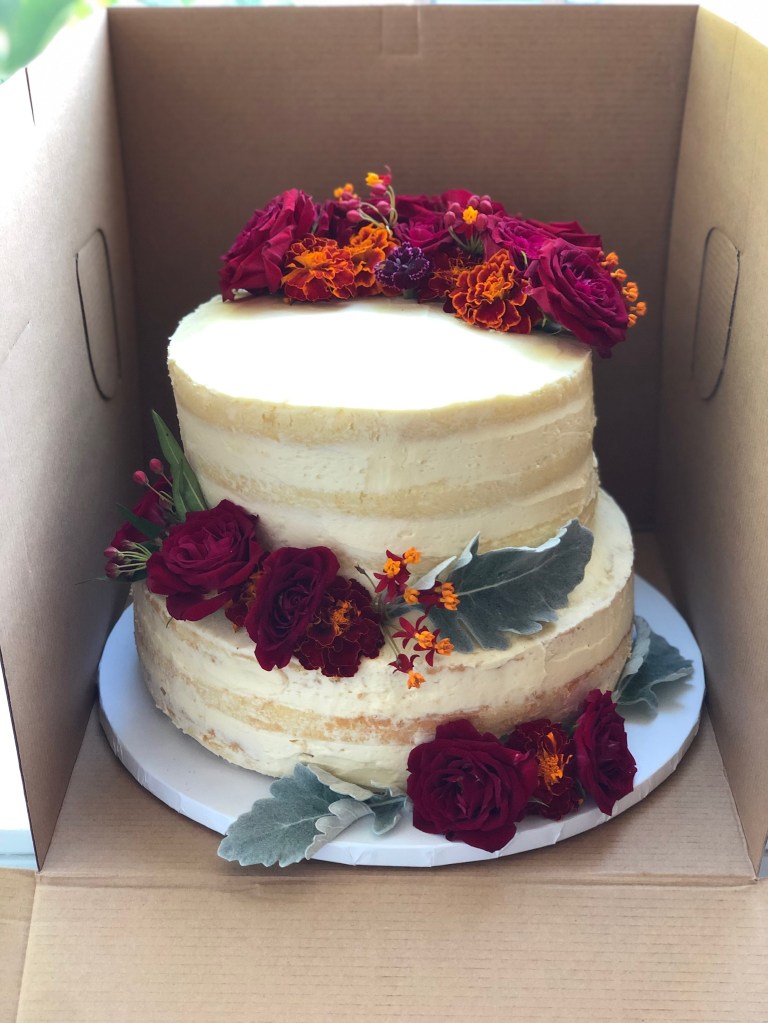
The Vision: I wanted the cake to match the vibe of the wedding, a fall solstice celebration, in a beautiful backyard in Pound Ridge, NY. Early on, I chose to try a semi-naked cake – where frosting is actually scrapped away from the edges of the layers of the cake. I loved the rustic and relaxed look of the cake however, here I will reveal Lesson #1: By scrapping away so much frosting – it is much harder to hide any imperfections in the cake itself. Also, not all recipes lend themselves well to this frosting technique. Case in point, my first trial run (see below).
Tools: My first stop on this road was to NY Cake, where I arrived prepared with 1,000,000 questions and left armed with all the tools I needed to start prepping my cake. The essentials included: 10 and 8 inch round pans (I decided on a two tiered cake to feed about 75 guests), a cake scrapper, 2 different sized offset icing spatulas, a rotating cake stand, cake boards and a cake drum (these are different), a cake box (to transport the cake), precut circular parchment paper the size of my rounds (huge time savers), wooden dowels, and flower tape for decorating (who knew!). Lesson #2: Purchase extra cake boards and make sure they are the size smaller than the actual size of the pans you are baking the cake in. The cake drum should be the size bigger than your largest layer.

Practice, Practice, Practice: For the cake, I decided to go with a recipe that I had tested and baked at least a few times before. It’s my very simple, crowd pleasing Brenda’s White Cake with Vanilla Butter Cream Frosting recipe that I used as the base for my Rainbow Surprise Cake. It freezes well so can be made in advance which I knew would help make assembly and frosting easier. In an effort not to waste the practice cakes, I did my first trial using a recipe I could use for our upcoming Rosh Hashanah Celebration. About one week out from the wedding, I settled on this Apple Cake, skipped the caramel and used this Cream Cheese Frosting. While not a complete disaster, the trial didn’t come close to the vision I had for the wedding cake. I’ll include a photo just to show how far I’ve come down this road:

After a slight panic attack, I thought it’d be worth another try, just to get the frosting and decorating down and approach the actual wedding cake with more confidence. To save time and money I made another attempt using boxed cake. Not wanting to waste the cake, I delivered it to the staff at my daughters’ school thinking I had explained that it was really meant as a trial to assemble, frost and decorate and that I hadn’t baked the actual cake I was planning to make for the wedding. I got a kick out of a stack of post-it notes I received in return and really appreciated the feedback!


Assembling and Frosting the Cake: This by far was the most stressful and hardest part of the entire process. I knew it would take some time so baked all of my layers five days out from the wedding, let them fully cool, wrapped them in plastic and carefully placed them in the freezer. For the two tiers, I baked three 10 inch layers and three 8 inch layers. I skimped on using a kitchen scale to ensure my layers were the same height and ended up using a school ruler just crossing my fingers it would all work out.


Other Helpful Resources: Early on in the process, I scoured bookstores for wedding cake cookbooks that would describe this whole process with simple steps – especially assembling the tiers, the dowels and frosting. Nothing I found was comprehensive so I resorted to YouTube videos. The one I found most helpful was by Chelsweets. Her description of inserting dowels and frosting a semi-naked cake seemed the simplest and relatively easy to follow. The step that did trip me up was the leveling of the layers themselves. I had practiced on both my trials but had not anticipated how difficult it would be to level a frozen layer. I leveled the first tier and decided the top layers were level enough which ended up being my biggest mistake. Lesson #3: Do not skip the step of leveling the cakes, even if it seems intimidating this is an essential step, especially when it comes to staking you’re layers. I learned the hard way and ended up with a slightly uneven cake.

Decorating the Cake: The sight of my assembled and semi-frosted cake after all of my research and practice brought me very close to tears. I debated taking off the second tier and trying to start the leveling and frosting over but silenced the perfectionist in me and quickly learned Lesson #4: What can’t be hidden with frosting can be hidden with flowers! I knew I wanted to decorate the cake with fresh flowers and enlisted hep from the owner of Hidden Acre Farm at our local farmers market in Carroll Garden about what flowers were edible and which ones had to be wrapped in plant tape before inserting into the cake. I purchased a small box of fresh marigolds and other small, fall, edible flowers which kept in the fridge about a week and purchased the rest (red roses to match the wedding flowers) the day before the wedding. I also made a last minute decision to add fresh sliced figs throughout.


Final Thoughts: In the end, I was pleased with the final result. The bride was happy, the guests seemed to really enjoy the cake (or at least that’s what they told me!) All in all it was a true labor of love, I don’t think I would have taken on this task for just anyone. For me, baking and cooking are the greatest expressions of love, it’s a way to celebrate, to bring people together and to show them how much I care. I couldn’t think of a person who has given more to me throughout my professional life and it was greatest gift I could give. Which brings me to my final Lesson #5: Don’t take things too seriously and remember to have fun, it’s just a cake!

